Home grow: how to harvest cannabis in 6 super simple steps
- Here’s your beginner’s guide to how to harvest cannabis from a home grow.
- It includes best practices to harvest the highest quality cannabis.
- We lay out everything you need to know—from flushing and trimming to drying and curing.
13-minute read
Learning How to Harvest Cannabis is Easier than you might think
Whether you’re starting to grow cannabis in your house, on a balcony, or in your garden, home grow is now legal in 18 US states and Washington, DC. If you’ve decided to grow your own, there’s a lot to learn. The good news is that you can start growing with very little investment. But you know that. So, once you’ve germinated your seeds, planted, and given your new garden lots of love, what comes next? Here’s our step-by-step guide on how to harvest cannabis for beginners.
How long before you can harvest cannabis?
From seed to maturity, cannabis plants are ready to harvest somewhere between 2 and 8 months. That depends a lot on where you’re growing them. If you’re planting indoors, your home grow might be fully mature in as little as 9 weeks.
How to Harvest Cannabis—Step 1: Remember to Flush! (No, seriously.)
Flushing is a vital step before you harvest cannabis. Flushing your cannabis involves saturating the soil and roots of your plant with a lot of water. This process “flushes” your plants of excess nutrients and fertilizer that you added in the growing stages. In preparation for harvest, flushing your cannabis plant forces it to use up any stored nutrients and remove excess chlorophyll. Those can make your bud harsh. You want the smoothest experience possible. Plus, flushing your plants comes with other potential benefits. It can aid in producing healthier, higher quality buds. It can also potentially reduce your curing time. So, please don’t forget to flush.
When to Flush
Flush your plants 7-14 days before harvesting. The exact timing will depend on how long the flowering stage is for the strain you’re growing. For example, if the flowering period is 8 weeks, you could start to flush your plants after 6-7 weeks of flowering. So, when you buy your seeds or plants, make sure you learn what their flowering period is. You can even check what the recommended period is for flushing. Don’t be afraid to ask questions when you purchase from farms! Their whole operation is founded in passion. You want the best care for your plant baby, right? Also, it doesn’t hurt to double check your soil type. This can impact how long you flush or whether you even need to flush your cannabis. For instance, if you’re growing with natural living soil (a.k.a. ‘super soil’), experts recommend not flushing.
How to confirm your cannabis plant is ready to be flushed
Flushing allows your plant to reset before you harvest. How can you know for sure that your plant is ready? Look at the trichomes on your plant’s leaves. If they’ve turned from clear to white, you can officially start. To prepare for a flush, stop feeding your cannabis plant additional nutrients.
How to Flush in Planters
Be sure to place your plant near a drain or outside. Fill a large container, like a bucket, with clean water. Flushing takes a lot of water (preferably room temperature and a PH of ~6). So, the more the merrier. Have a small container on hand to scoop water out of the bucket to flush your plant. Add the water to the soil, pouring evenly to distribute the water everywhere. Keep pouring until it’s heavily saturated and you see a steady runoff at the roots. Remember: the aim is to push out those extra nutrients that are trapped in the soil. Water, water, then water some more. Once you see a flowing stream, you know you’ve done your job. Stop watering and allow the base of your plant to drain on its own until it’s barely dripping. And, yes, you should do this daily until you harvest.
How to Flush if You’re Growing Outdoors
Is your cannabis plant living its best life out in the sunshine? No worries. In this case, ditch the bucket because time is precious. Use your garden hose. The general rule of thumb is to water the plant using 2.5-3 times the amount of water used for regular irrigation.
Outdoor Containers
If your plant is in an outdoor container, the daily process can last from 5-12 days. Flush plants that are in large containers for 10-12 days. Plants that are grown in smaller containers can be flushed for only 5-7 days. Look out for free flowing water to make sure the soil is saturated with water. No holes at the bottom of your planter? Be cautious not to overflood your plant pot. This can cause your roots to rot and we don’t want that. Use a little less water if you’re unsure whether you’re putting in too much. And next time, to make it easier, go for a pot with holes.
Growing in the Ground
As for plants that are directly in the ground, start by referring to the type of soil you’re using to grow. In particular, check how much of your soil is clay or sand. Generally, the more clay soil has, the more water you’ll need to flush it. That’s because clay tends to hold onto water longer, so expect to flush for 15-20 days. If your soil has a higher sand content, flush for 10-15 days. Although you technically can’t flush the roots of your outdoor grown cannabis plant, the process can be applied to support a nutrient purge.
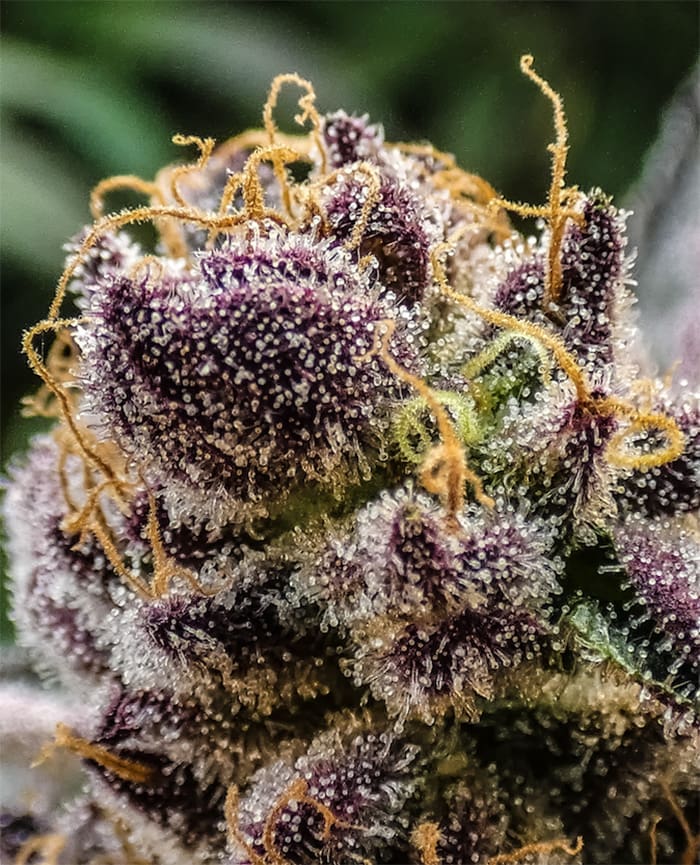
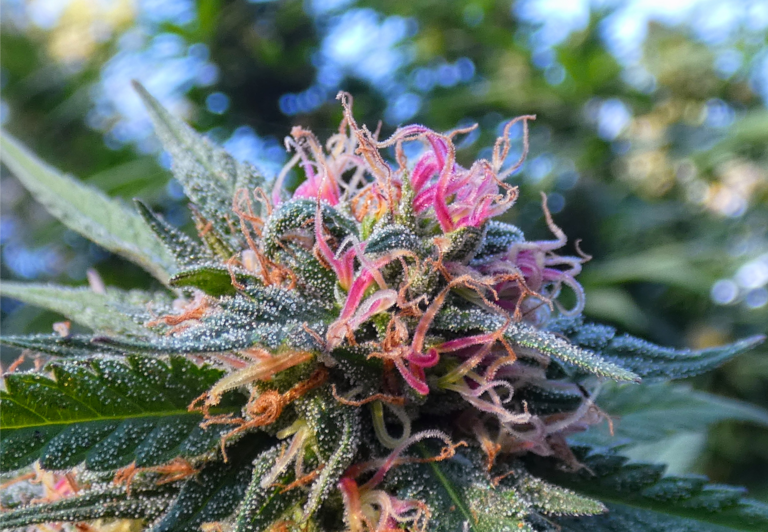
How to Harvest Cannabis: Step 2—When to Trim
We know what you’re thinking—are we there yet?? You’ve been eyeing your cannabis plant daily. Patiently waiting to reap the rewards. Well, it’s great that you’ve been stalking your plant. Visual cues are the key to determine when your cannabis is ready to harvest. Just take a look at its trichomes. What are trichomes? Glad you asked. They’re the crystal-like hairs that appear mainly on the flowers and leaves of your plants a few weeks after they start to flower. Trichomes are where most of the cannabinoids and terpenes are produced—that’s the good stuff! Trichomes start out transparent with resin. It’s best to harvest cannabis when the trichomes turn milky white, or frosty. This signals that your bud is at its most potent. Be sure to trim ASAP. Once trichomes go from milky white to shades of amber, your crop will have lost most of its psychoactivity.
Tools You’ll Need to Harvest Cannabis
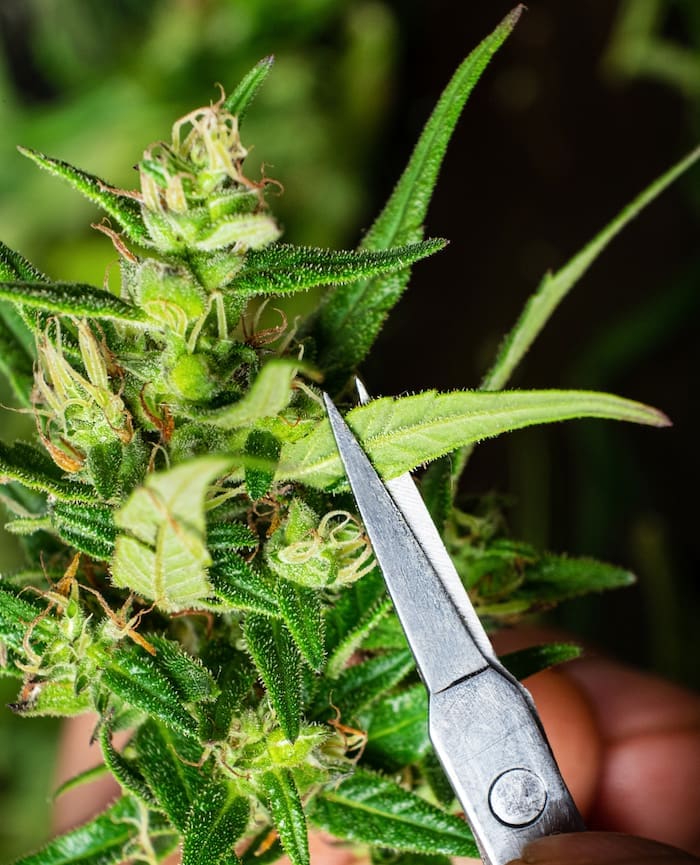
Sharp trimming tools
It’s time to start snipping! Ditch your dull and rusty scissors in the junk drawer. This job requires a sharp set of scissors or pruning shears. You can opt for a pair of inexpensive, yet super effective, titanium blade scissors. If you have a larger harvest, we suggest using pruning shears. They’re way more efficient to cut bigger branches. They can also assist with more accurate cutting.
Harvesting is a sticky business
Keep a box of gloves, a bottle of rubbing alcohol, and some paper towels on deck. As you cut, that good ol’ sticky resin releases from the trichomes. As a result, your scissors or shears will get gunky fast and become sticky. Thankfully, rubbing alcohol cuts through resin easily. Just dab a little alcohol on your paper towel to periodically wipe down your tools.
Harvesting is also messy
Harvesting cannabis is a messy process. Still, there’s a lit joint at the end of this tunnel. To prevent the inevitable mess, set yourself up to cut on a tray or any other clean, flat surface. Doing this allows you to catch any plant matter that falls off while you’re trimming. If you’re dry trimming (which we’ll explain shortly), this is key because you could also lose some kief. As the trichomes on your plant dry, they become kief—a powdery, pollen-like substance. Kief stores all those cannabinoids that you patiently waited for. Hence, there’s no room for waste. You can also maximize the resin you collect by scraping the excess material collected on your trimming tools. Put it in an airtight container for safe keeping.
Trimming Methods
Don’t abandon your patience just yet. Trimming can take hours, or even days. So, get ready with a vibrant playlist or a stimulating audiobook. Then, decide which method you want to use to harvest your cannabis. There are 2 ways you can do it: wet trimming or dry trimming.
Wet Trimming
Wet trimming is the process of trimming your plant before you’ve dried it. Got a leafy plant with lots of dense, bushy buds? This is the method for you. Wet trimming allows dense buds to dry faster and more evenly. When trimmed, your buds are thoroughly exposed to air thus preventing the dreaded bud rot. This method can help preserve delicate trichomes because they’re less brittle at this stage. Sugar leaves, the small, protective leaves that grow around the buds, are easy to remove as well. Like buds, sugar leaves produce fragrant trichomes which protect the plant and contain the cannabinoids and terpenes. Because of the trichomes, they look like they’re dusted in sugar. Trim your sugar leaves diligently. This will help you prevent any moisture from being trapped in the buds. Trapped moisture can lead to mildew or mold. (Ew.) More on how to trim sugar leaves later.
Dry Trimming
Dry Trimming is the process of trimming your cannabis after the plant is dried. This method is suitable for slim and low density buds. If your plant is growing on the skinny side, dry trimming allows the leaves to stay on it as extra protection for your bud. The leaves prolong the drying process so your bud doesn’t dry out too quickly and, as a result, lose potency. If you’re not a fan of messiness, dry trimming may be the route to go because dry buds aren’t as sticky. Be aware that dry trimming includes utilizing more space for drying. Before you trim it down the buds, let your plant fully dry by hanging the branches for 2-7 days first. It may take a little longer since the leaves are still on it. (See below for dry room conditions).
How to Harvest Cannabis—Step 3: Trimming Techniques
Precious Cargo, Handle With Care
Roll up those sleeves, cuz it’s go time. First things first—BE GENTLE. Handle your flower with care. You want to protect the integrity of the delicate trichomes as much as possible. Start at the bottom of your plants. Then, handling each one by the stem, cut the branches off your plant. Minimize your contact with the buds as much as possible. Remember, the more frequently you touch your buds, the more you degrade their quality. So, try to only handle the stems and stalks of your plants.
Branch by branch
Lay each branch down gently at your workstation. Then, hold its stalk upside down for maximum visibility. First, remove the individual buds from the branch. For our total cannanerds, the industry term for this process is “bucking”. This allows you to work in little clusters so you can see as many of the leaf stems as possible for accurate trimming. Avoid cutting the entire stem off your buds. Leave them for easy handling and to maintain the integrity of the flower & trichomes. Second, remove the largest part of the branch. That’ll be the fan leaves. You know that iconic long leaf that comes to mind when you think of the cannabis plant? That’s the one we’re talking about. The fan leaves are one of the largest and the most recognizable parts of the plant. Simply snip them closely at the base to remove the entirety of the fan leaf’s stem.
Cut with Caution
Last, reign in your focus to remove the sugar leaves. (We suggest a puff of Cinex or Sour Diesel!) Without closing your shears, slide the tip as close as possible to the base. Take a second to visually confirm you’re trimming the leaf, not the flower. Once you’re sure, use the tip of your trimming tool to cut the base of your sugar leaves. Aim for a clean cut where the stem of the leaf meets the branch. If you see that the base of the leaf goes deeper than your bud, remove as much of the leaf as possible up to the point of the flower. Avoid rapidly cutting close up to the flower. This may seem like an efficient way to trim, but it will damage your flower and remove precious trichomes. Lastly, don’t obsess over manicuring your leaves to the point of cutting into your flower.
How to Harvest Cannabis—Step 4: Drying
You’re one step closer to getting high on your own bud! Time to dry. Drying typically takes 2-7 days. If you went the dry trimming route, just double check your bud stems to make sure they’re completely dry. Do that by bending the stem or branch. If it snaps easily and audibly, they’re good to go for curing. YAY! As for wet trimmed cannabis, there’s one more step. That’s the actual drying. *Gently* place your manicured buds on a drying rack like a freshly picked daisy. You want to prevent any smushing or flattening. Keep your drying rack in a dark space with temperatures between 60-70 degrees F and humidity between 55-65%. You can track those with a thermostat and a handy hygrometer. You might never have heard of them, but you can buy a hygrometer online for under 10 bucks.
Moisture check
After the 2-7 day drying window, test your plant’s dryness by bending a stem. Did it snap? If so, you’re good to go with your harvest. If it bends, wait a few days more and check frequently.
How to Harvest Cannabis—Step 5: Curing
After trimming, one of the most important steps in how to harvest cannabis is curing. Curing is the process of removing any extra moisture, sugars, and chlorophyll from your buds. Curing is crucial to the harvesting process. It affects the overall quality of your cannabis. Curing can take from 2-4 weeks. You’ll need an airtight jar—like a mason jar—to store your cannabis. Fill the jar up with your buds completely. Avoid compacting the buds or stuffing them tightly into the jar. So leave your bud with some wiggle room. Then, give it a gentle shake to evenly distribute your bud. Finally, pop on the lid and keep it in a cool, dry, dark place.
Check on your curing jar
After two days, your buds should soften. You can touch the buds to confirm if they’re just right. Feel for a slight spring when you pinch them. If you’re unsure whether your cannabis is too dry, splurge on that digital hygrometer to get an exact measurement of the humidity in your jars. The humidity should only be between 55-65% in the sealed jars. If the humidity level is higher than that or your buds feel too wet, leave the lid off for up to 24 hours and check its humidity levels throughout the day.
Say excuse me after you “burp”
After a week of curing, open your jar for a few minutes each day to let the buds breathe, or “burp”. Burping is important because it releases CO2 and moisture from the jars while replenishing oxygen for optimal curing. That helps remove any potentially harmful moisture from being sealed into the jar. Burping aids to enhance the flavor, aroma, and appearance of cannabis. There are a few ways to tell when your cannabis is fully cured. Take a cannabis bud and squish it between your fingers. The bud should feel dry and maintain its shape. If it’s not ready, the bud will feel squishy, possibly wet, and won’t maintain shape.
How to Harvest Cannabis—Step 6: Storing
Pat yourself on the back because you made it to the end. Congrats! After curing, continue to store your cannabis in a cool, dark place. Avoid storing cannabis in the heat. This can make your buds get moldy and reduce their potency. It’s best to store your cannabis in airtight containers to minimize oxygen exposure. Keep your buds fresh for as long as possible. You deserve the best quality after all the hard work you’ve put in. Now, you know how to harvest cannabis. What are you still doing here? Put down this article and spark up a joint. You earned it!